Cloud Resume Challenge Part 1 - Building a Static S3 Website, Implementing CloudFront and Configuring Route53 DNS

In today's competitive job market, having a strong and well-crafted resume can make a significant difference in landing your dream job. However, simply having a well-written resume is no longer enough. Employers are looking for candidates who have hands-on experience with modern technology and a strong understanding of cloud computing.
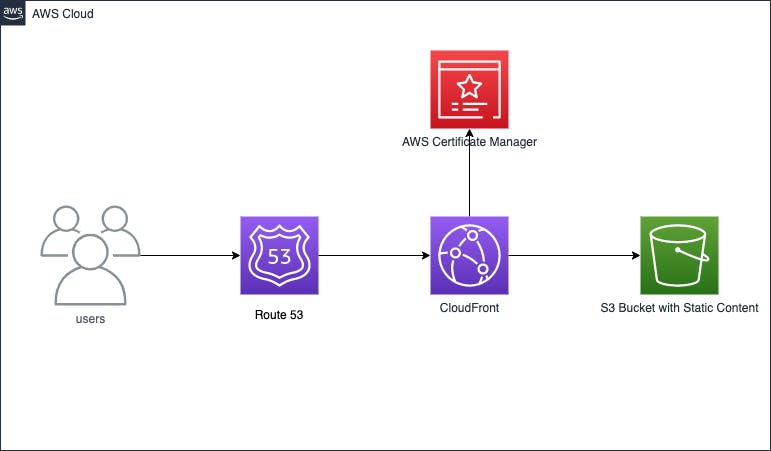
The Cloud Resume Challenge is a series of hands-on projects designed to help you build real-world cloud computing skills and demonstrate your expertise on your resume. In this first part of the challenge, you will learn how to build a static S3 website, implement CloudFront for faster delivery, and configure Route53 DNS to associate a custom domain name with your website.
Step 1: Setting up an S3 Bucket
The first step in building a static S3 website is to create an S3 bucket. S3 is Amazon Web Services' object storage service that provides industry-leading scalability, data availability, security, and performance. To create an S3 bucket:
Open the Amazon S3 console
Click the “Create Bucket” button
Give your bucket a unique name, select a region, and choose the default settings for all other options
Click the “Create” button to create your S3 bucket

Step 2: Uploading Your Website Files to S3
Once you have created your S3 bucket, it's time to upload your website files. You can either drag and drop your files into the S3 console or use the AWS CLI to upload the files.

Step 3: Implementing CloudFront for Faster Delivery
Now that your website is hosted on S3, it's time to implement CloudFront for faster delivery. CloudFront is a content delivery network (CDN) service that speeds up the delivery of your static website by caching content at locations around the world. To implement CloudFront:
Open the AWS Management Console
Go to the CloudFront dashboard
Click the “Create Distribution” button
Choose your S3 bucket as the origin
Configure the other options as desired
Click the “Create Distribution” button
I've created 2 for both estebanmoreno.link and estebanmoreno.link domain names

Step 4: Configuring Route53 DNS
The final step in building your static S3 website is to configure Route53 DNS. Route53 is Amazon's highly available and scalable Domain Name System (DNS) web service. To configure Route53:
Register your domain using Route53 (Hosted Zone will be created automatically by Route53 Registar)
Open the Route53 dashboard
Click on the Hosted Zone associated with your domain name
Add an “A” record for your website pointing to the CloudFront Distribution created earlier
Enter the CloudFront distribution domain name as the value for the “A” record
Save your changes

Finally, you can now access your static S3 website by visiting the URL associated with your domain. Check out the example website created for this challenge at https://estebanmoreno.link to see the final result of your efforts.
By successfully completing the first part of the Cloud Resume Challenge, you have acquired the skills to build a static S3 website, implement CloudFront for faster content delivery, and configure Route53 DNS for a custom domain name. Your website is now live and ready for visitors. Congratulations!

