Building a Scalable 2-Tier Architecture in AWS with Terraform and Terraform Cloud CI/CD
Cloud Engineer and DevOps enthusiast, just talking about AWS, Docker, Linux, Kubernetes, Python, and automation.
In a modern cloud infrastructure setup, creating a robust and scalable 2-tier architecture is essential. Such an architecture helps meet the demands of your applications while ensuring repeatability, reliability, and security. In this article, we'll outline the steps to design and implement a 2-tier architecture in AWS using Terraform, with a specific focus on modularization.
Additionally, we'll discuss how to deploy and manage this infrastructure with Terraform Cloud for continuous integration and continuous delivery (CI/CD) while integrating it with a GitHub account.

For the full Terraform code and project details, visit my GitHub repository at the following link to access the code: GitHub Project - Terraform 2-Tier Architecture. Explore, fork, and use the code to build your own scalable and robust 2-tier architecture.
Part 1: Building the 2-Tier Architecture
In this part, we will create a 2-Tier architecture using Terraform modules to ensure code repeatability and maintainability. The following file structure will be used:
.
├── LICENSE
├── main.tf
├── outputs.tf
├── terraform.tfvars.example
├── variables.tf
└── modules
    ├── database
    │   ├── main.tf
    │   ├── outputs.tf
    │   └── variables.tf
    ├── ec2_auto_scaling
    │   ├── main.tf
    │   ├── outputs.tf
    │   └── variables.tf
    ├── load_balancer
    │   ├── main.tf
    │   ├── outputs.tf
    │   └── variables.tf
    └── networking
        ├── gateways.tf
        ├── outputs.tf
        ├── route_table.tf
        ├── security-groups.tf
        ├── variable.tf
        └── vpc.tf
Steps:
Create a Custom VPC: We create a custom VPC with two public subnets for the Web Server Tier and two private subnets for the RDS Tier.
 # Create a VPC with the specified CIDR block and default tenancy.
 resource "aws_vpc" "two-tierVPC" {
   cidr_block       = var.vpc_cidr
   instance_tenancy = "default"

   tags = {
     Name = var.vpc_name
   }
 }

 # Create the first public subnet in the specified VPC, with a public IP mapping.
 resource "aws_subnet" "public_subnet1" {
   vpc_id                  = aws_vpc.two-tierVPC.id
   cidr_block              = var.public_subnet1_cidr
   availability_zone       = var.availability_zone_1
   map_public_ip_on_launch = true

   tags = {
     Name = var.public_subnet1_name
   }
 }

 # Create the second public subnet in the specified VPC, with a public IP mapping.
 resource "aws_subnet" "public_subnet2" {
   vpc_id                  = aws_vpc.two-tierVPC.id
   cidr_block              = var.public_subnet2_cidr
   availability_zone       = var.availability_zone_2
   map_public_ip_on_launch = true

   tags = {
     Name = var.public_subnet2_name
   }
 }

 # Create the first private subnet in the specified VPC.
 resource "aws_subnet" "private_subnet1" {
   vpc_id            = aws_vpc.two-tierVPC.id
   cidr_block        = var.private_subnet1_cidr
   availability_zone = var.availability_zone_1

   tags = {
     Name = var.private_subnet1_name
   }
 }

 # Create the second private subnet in the specified VPC.
 resource "aws_subnet" "private_subnet2" {
   vpc_id            = aws_vpc.two-tierVPC.id
   cidr_block        = var.private_subnet2_cidr
   availability_zone = var.availability_zone_2

   tags = {
     Name = var.private_subnet2_name
   }
 }
Utilize NAT Gateway and Internet Gateway: We set up a NAT Gateway in one of the public subnets and an Internet Gateway for outbound internet traffic.
 # Create an AWS Internet Gateway for the VPC.
 resource "aws_internet_gateway" "two_tier_internet_gateway" {
   vpc_id = aws_vpc.two-tierVPC.id

   tags = {
     Name = var.igw_name
   }
 }

 # Create an Elastic IP (EIP) resource for the NAT Gateway.
 resource "aws_eip" "nat_gateway_eip" {
   domain = "vpc"
 }

 # Create an AWS NAT Gateway in one of the public subnets and associate it with the Elastic IP (EIP).
 resource "aws_nat_gateway" "two_tier_nat_gateway" {
   allocation_id = aws_eip.nat_gateway_eip.id
   subnet_id     = aws_subnet.public_subnet1.id

   tags = {
     Name = var.nat_gateway_name
   }

   # To ensure proper ordering, it is recommended to add an explicit dependency
   # on the Internet Gateway for the VPC.
   depends_on = [aws_internet_gateway.two_tier_internet_gateway]
 }
Configure Route Tables: We create a public route table and a private route table to control traffic routing. This code snippet manages the route tables for the VPC.
 # Create a public route table for the VPC and add a route to the Internet Gateway.
 resource "aws_route_table" "public_routetable" {
   vpc_id = aws_vpc.two-tierVPC.id

   route {
     cidr_block = var.public_rt_cidr
     gateway_id = aws_internet_gateway.two_tier_internet_gateway.id
   }

   tags = {
     Name = var.public_rt_name
   }
 }

 # Create a private route table for the VPC and add a route to the NAT Gateway.
 resource "aws_route_table" "private_routetable" {
   vpc_id = aws_vpc.two-tierVPC.id

   route {
     cidr_block = var.private_rt_cidr
     gateway_id = aws_nat_gateway.two_tier_nat_gateway.id
   }

   tags = {
     Name = var.private_rt_name
   }
 }

 # Associate the public route table with the first public subnet.
 resource "aws_route_table_association" "public_subnet1_rt_association" {
   subnet_id      = aws_subnet.public_subnet1.id
   route_table_id = aws_route_table.public_routetable.id

   depends_on = [aws_route_table.public_routetable]
 }

 # Associate the public route table with the second public subnet.
 resource "aws_route_table_association" "public_subnet2_rt_association" {
   subnet_id      = aws_subnet.public_subnet2.id
   route_table_id = aws_route_table.public_routetable.id

   depends_on = [aws_route_table.public_routetable]
 }

 # Associate the private route table with the first private subnet.
 resource "aws_route_table_association" "private_subnet1_rt_association" {
   subnet_id      = aws_subnet.private_subnet1.id
   route_table_id = aws_route_table.private_routetable.id

   depends_on = [aws_route_table.private_routetable]
 }

 # Associate the private route table with the second private subnet.
 resource "aws_route_table_association" "private_subnet2_rt_association" {
   subnet_id      = aws_subnet.private_subnet2.id
   route_table_id = aws_route_table.private_routetable.id

   depends_on = [aws_route_table.private_routetable]
 }
Create Security Groups: Properly configured security groups are essential for the Application Load Balancer, web servers, and RDS instance. The code provided defines security group rules for each of these resources.
 # Create a security group for the Application Load Balancer (ALB).
 resource "aws_security_group" "alb_sg" {
   name   = var.alb_sg_name
   vpc_id = aws_vpc.two-tierVPC.id

   # Define inbound rules to allow incoming HTTP traffic from any source.
   ingress {
     from_port   = 80
     to_port     = 80
     protocol    = "tcp"
     cidr_blocks = ["0.0.0.0/0"]
   }

   # Define outbound rules to allow all traffic from the security group.
   egress {
     from_port        = 0
     to_port          = 0
     protocol         = "-1"
     cidr_blocks      = ["0.0.0.0/0"]
     ipv6_cidr_blocks = ["::/0"]
   }

   tags = {
     Name = var.alb_sg_tag_name
   }
 }

 # Create a security group for the Auto Scaling Group (ASG).
 resource "aws_security_group" "asg_sg" {
   name   = var.asg_sg_name
   vpc_id = aws_vpc.two-tierVPC.id

   # Define inbound rules to allow incoming HTTP traffic from the ALB security group.
   ingress {
     from_port       = 80
     to_port         = 80
     protocol        = "tcp"
     security_groups = [aws_security_group.alb_sg.id]
   }

   # Define inbound rules to allow incoming SSH traffic from any source.
   ingress {
     from_port   = 22
     to_port     = 22
     protocol    = "tcp"
     cidr_blocks = ["0.0.0.0/0"]
   }

   # Define outbound rules to allow all traffic from the security group.
   egress {
     from_port        = 0
     to_port          = 0
     protocol         = "-1"
     cidr_blocks      = ["0.0.0.0/0"]
     ipv6_cidr_blocks = ["::/0"]
   }

   tags = {
     Name = var.asg_sg_tag_name
   }
 }

 # Create a security group for the RDS database.
 resource "aws_security_group" "db_sg" {
   name   = var.db_sg_name
   vpc_id = aws_vpc.two-tierVPC.id

   # Define inbound rules to allow incoming MySQL traffic from the ASG security group.
   ingress {
     from_port       = 3306
     to_port         = 3306
     protocol        = "tcp"
     security_groups = [aws_security_group.asg_sg.id]
   }

   # Define inbound rules to allow incoming SSH traffic from the ASG security group.
   ingress {
     from_port       = 22
     to_port         = 22
     protocol        = "tcp"
     security_groups = [aws_security_group.asg_sg.id]
   }

   # Define outbound rules to allow all traffic from the security group.
   egress {
     from_port        = 0
     to_port          = 0
     protocol         = "-1"
     cidr_blocks      = ["0.0.0.0/0"]
     ipv6_cidr_blocks = ["::/0"]
   }

   tags = {
     Name = var.db_sg_tag_name
   }
 }
Launch an Internet-Facing Application Load Balancer: We create an Internet-facing Application Load Balancer targeting the web servers. The ALB listener listens for incoming traffic and forwards it to the target group.
 # Create an AWS Application Load Balancer (ALB) in the public subnets.
 resource "aws_lb" "public_subnet_alb" {
   name               = var.public_subnet_alb_name
   load_balancer_type = "application"
   security_groups    = [var.alb_sg_id]
   subnets            = [var.public_subnet1_id, var.public_subnet2_id]

   tags = {
     Name = var.public_subnet_alb_name_tag
   }
 }

 # Create an AWS Target Group to define how traffic is distributed to the backend instances.
 resource "aws_lb_target_group" "alb_target_group" {
   name     = var.target_group_name
   port     = var.target_group_port
   protocol = var.target_group_protocol
   vpc_id   = var.vpc_id
 }

 # Create an ALB listener to listen for incoming traffic and forward it to the target group.
 resource "aws_lb_listener" "alb_listener" {
   load_balancer_arn = aws_lb.public_subnet_alb.arn
   port              = var.alb_listener_port
   protocol          = var.alb_listener_protocol

   default_action {
     type             = "forward"
     target_group_arn = aws_lb_target_group.alb_target_group.arn
   }
 }
Launch an EC2 Auto Scaling Group: An Auto Scaling Group is created to manage Apache web servers. The Launch Template defines the instance configuration and user data to install Apache on the instances.
 # Create an AWS Launch Template for the Auto Scaling Group (ASG).
 resource "aws_launch_template" "lt_asg" {
   name                   = var.lt_asg_name
   image_id               = var.lt_asg_ami
   instance_type          = var.lt_asg_instance_type
   key_name               = var.lt_asg_key
   vpc_security_group_ids = [var.asg_sg_id]
   user_data              = filebase64("${path.root}/install-apache.sh")
 }

 # Create an AWS Auto Scaling Group (ASG) to manage instances based on the Launch Template.
 resource "aws_autoscaling_group" "asg" {
   name                = var.asg_name
   max_size            = var.asg_max
   min_size            = var.asg_min
   desired_capacity    = var.asg_desired_capacity
   vpc_zone_identifier = [var.public_subnet1_id, var.public_subnet2_id]

   launch_template {
     id      = aws_launch_template.lt_asg.id
     version = "$Latest"  # Latest version of the Launch Template.
   }

   # Create a tag to identify instances in the Auto Scaling Group.
   tag {
     key                 = "Name"
     value               = var.asg_tag_name
     propagate_at_launch = true
   }
 }

 # Attach the Auto Scaling Group to the Application Load Balancer's Target Group.
 resource "aws_autoscaling_attachment" asg_tg_attachment {
   autoscaling_group_name = aws_autoscaling_group.asg.id
   lb_target_group_arn    = var.alb_tg_arn
 }
Deploy an RDS MySQL Instance: We launch an RDS MySQL instance within the private RDS subnet. The RDS instance is created with the specified configuration and dependencies.
 # Create an RDS (Relational Database Service) subnet group for the database.
 resource "aws_db_subnet_group" "db_subnet" {
   name       = var.db_subnet_name
   subnet_ids = [var.private_subnet1_id, var.private_subnet2_id]
 }

 # Launch an RDS database instance within the specified subnet group.
 resource "aws_db_instance" "db_instance" {
   allocated_storage    = var.allocated_storage
   db_name              = var.db_name
   db_subnet_group_name = var.db_subnet_name
   engine               = var.engine
   engine_version       = var.engine_version
   instance_class       = var.instance_class
   username             = var.username
   password             = var.password
   parameter_group_name = var.parameter_group_name
   skip_final_snapshot  = var.skip_final_snapshot

   # Ensure that the RDS instance creation depends on the DB subnet group.
   depends_on = [aws_db_subnet_group.db_subnet]
 }
Create and Build the 2-Tier Architecture with Modules: To create a 2-Tier Architecture with existing modules, declare them in your
main.tf. Specify the module's source and input variables. Terraform handles the rest, simplifying architecture management.# Create the networking module for VPC and subnets. module "networking" { source = "./modules/networking" } # Create the load balancer module and pass required variables. module "load_balancer" { source = "./modules/load_balancer" alb_sg_id = module.networking.alb_sg_id public_subnet1_id = module.networking.public_subnet1_id public_subnet2_id = module.networking.public_subnet2_id target_group_port = 80 target_group_protocol = "HTTP" vpc_id = module.networking.vpc_id alb_listener_port = 80 alb_listener_protocol = "HTTP" } # Create the EC2 Auto Scaling module and pass required variables. module "ec2_auto_scaling" { source = "./modules/ec2_auto_scaling" asg_sg_id = module.networking.asg_sg_id public_subnet1_id = module.networking.public_subnet1_id public_subnet2_id = module.networking.public_subnet2_id alb_tg_arn = module.load_balancer.alb_tg_arn } # Create the database module for RDS instance and pass required variables. module "database" { source = "./modules/database" private_subnet1_id = module.networking.private_subnet1_id private_subnet2_id = module.networking.private_subnet2_id allocated_storage = 5 db_name = "twotierdb" engine = "mysql" engine_version = "5.7" instance_class = "db.t3.micro" username = var.db_username password = var.db_password parameter_group_name = "default.mysql5.7" skip_final_snapshot = true }
By following these steps and using Terraform modules, we can build a robust 2-Tier architecture with a scalable and maintainable infrastructure. This architecture is well-suited for a variety of applications and workloads.
Part 2: Leveraging Terraform Cloud for CI/CD
Deploying with Terraform Cloud and GitHub Integration: Now that we've created our 2-tier architecture using Terraform, let's take it to the next level by integrating it into a CI/CD pipeline.
Steps
Terraform Cloud Setup:
Create a Terraform Cloud account.
Set up your workspace, which is a container for your infrastructure.

Configure the necessary environment variables for your infrastructure, ensuring sensitive data is securely stored.

Terraform Cloud Configuration:
Connect your Terraform Cloud workspace to your GitHub repository. Go to the Workspace settings and select Version Control. Choose the
Version control workflowoption.
Configure a VCS (Version Control System) connection to your GitHub account.

Create a workspace trigger that activates when changes are pushed to your GitHub repository.

CI/CD Workflow:
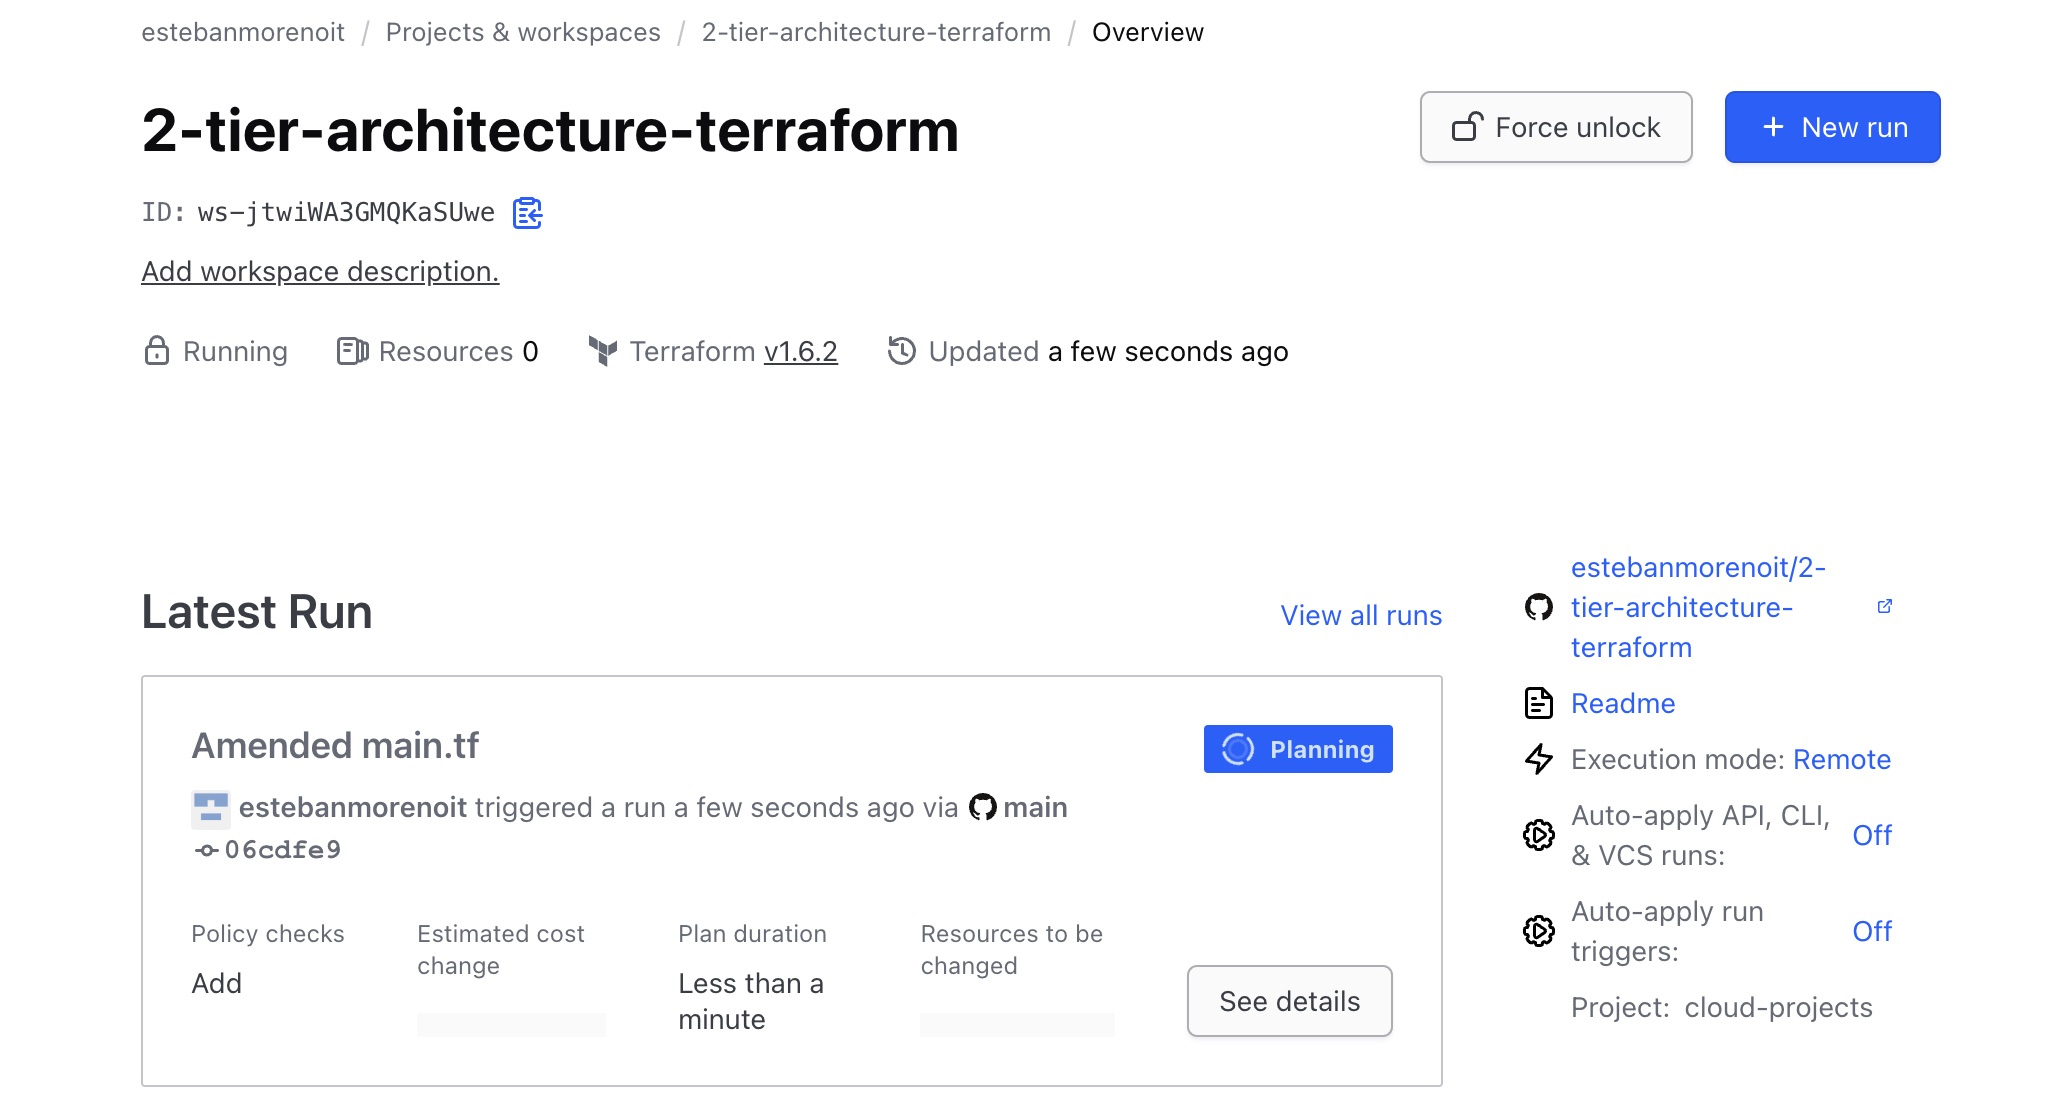
Whenever changes are pushed to your GitHub repository, Terraform Cloud automatically detects them and triggers a run in your workspace.
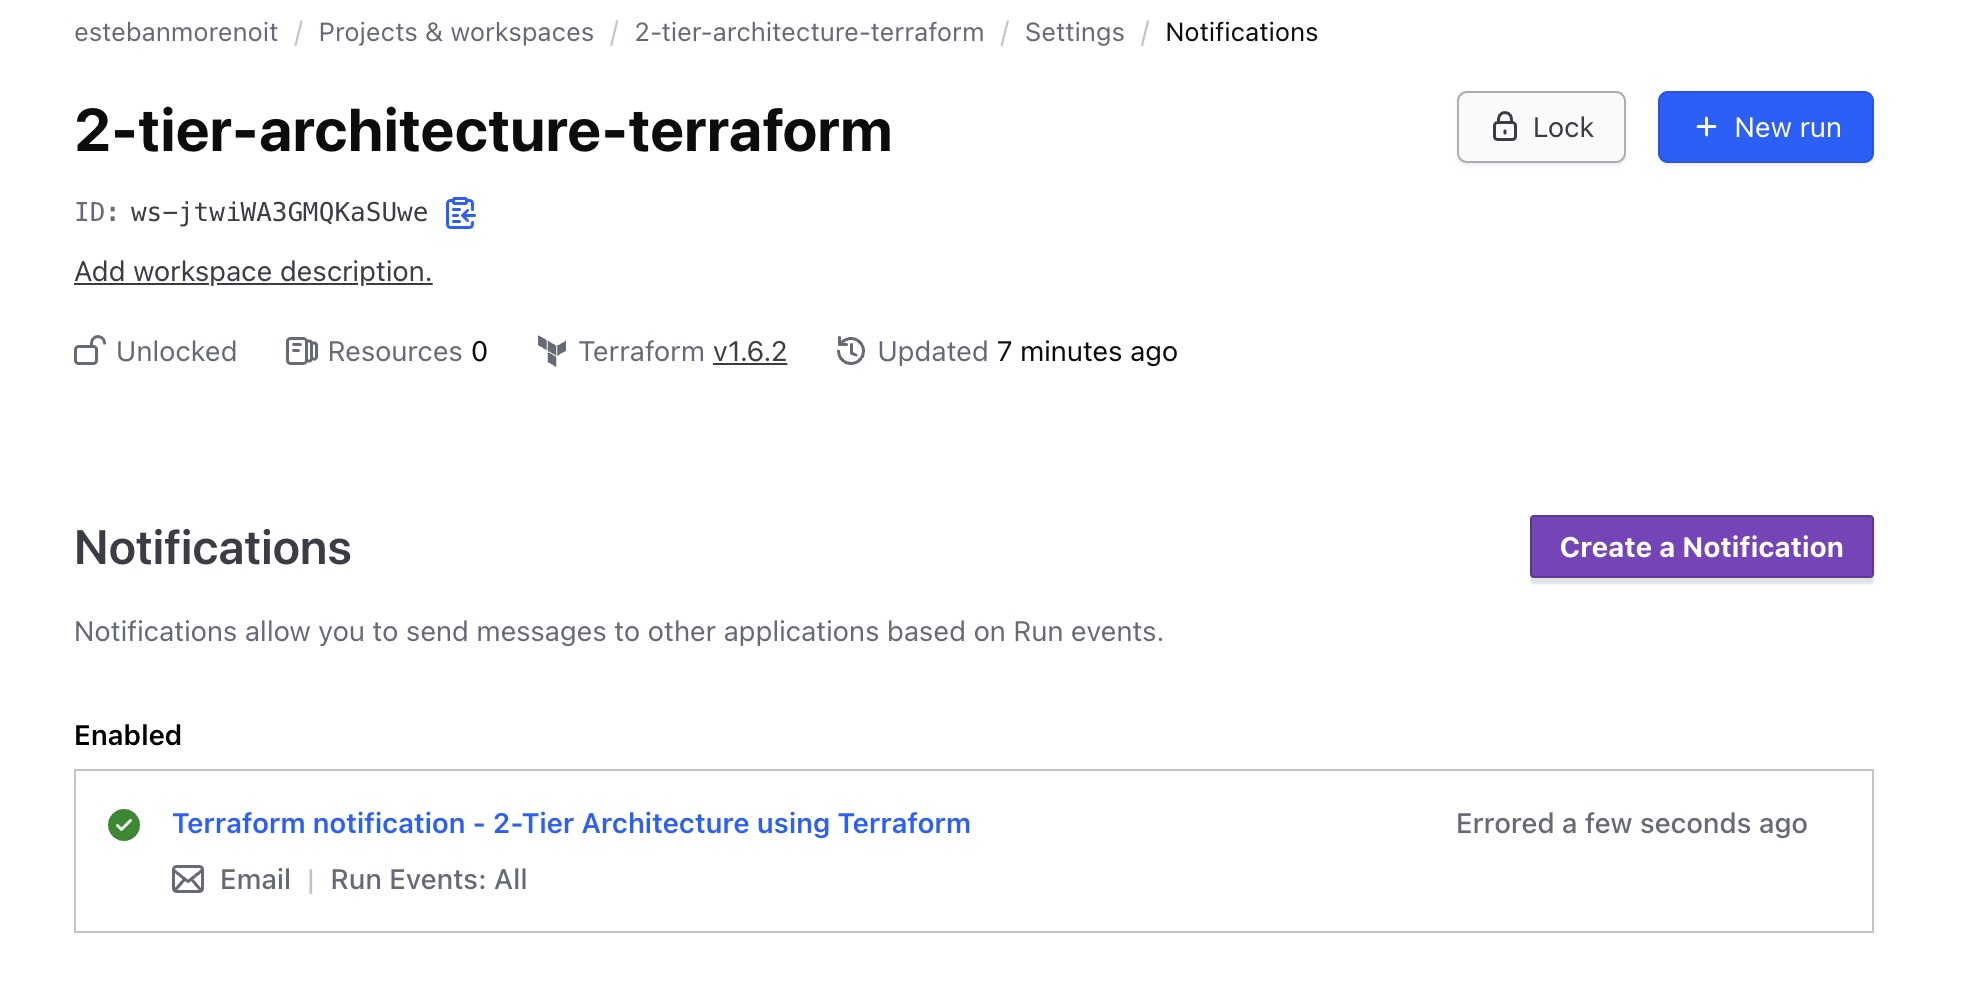
Notifications, logs, and version history are available within Terraform Cloud, offering transparency and traceability. A notification example can be found below to let us know every time there's a new event within our Terraform Workspace
Terraform Cloud applies your changes to the infrastructure, ensuring the latest version is deployed. Let's verify the correct execution of our 2-tier architecture using Terraform.

For a final confirmation, test the functionality of your application by copying the ALB_DNS_NAME output from Terraform Cloud and pasting it into your browser:

The successful execution of these steps should result in the visible operation of your application, as illustrated below:

Great news! 🚀 Our 2-Tier infrastructure is up and running as expected through the ALB DNS. This reflects the successful implementation of a scalable and robust architecture.
Conclusion
Building a scalable and secure 2-tier architecture with Terraform and Terraform Cloud is crucial for modern applications. Utilizing Terraform modules ensures your infrastructure remains organized and maintainable. Integration with CI/CD pipelines streamlines infrastructure management and updates, providing a robust and efficient deployment process. With Terraform and Terraform Cloud, your infrastructure code stays synchronized with your GitHub repository, enhancing deployment speed and maintaining a consistent, reliable state for adapting to your application's changing needs.